December 4, 2010
12 Days of Christmas Projects – Project #6
Christmas Project #6 –Fancy Favour Box with Robin
Here’s a very useful gift-box/bag that I’ve decorated with a punched-out robin using the Two-Step Birdy Punch. The idea for creating a Robin from the Two-Step Bird punch was presented by a very clever lady at our Regional Training Day – Carolyn Bennie – so, much credit and love to her!!!!
I’ve cut the Fancy Favour box with my Big Shot from Jolly Holiday Designer Series Paper and assembled it with Tombow Glue. Super quick!!! I’ve stamped the holly image from the Good Cheer stamp set in Old Olive and gently sponged the edges of the Whisper White cardstock with Early Espresso to soften the edges.
To make your Christmas Robin, you will need two sponge daubers, Whisper White cardstock, Cherry Cobbler & Early Espresso ink and the Two-Step Bird Punch.
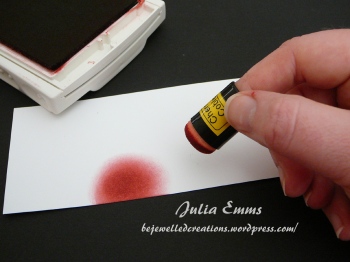
Start with Cherry Cobbler ink – dab your sponge dauber in the ink and then swirl it on a scrap of Whisper White cardstock. Keep dabbing back in the ink and apply to the cardstock again to achieve the depth of colour you want. When you’re happy with the depth of colour, grab your next dauber and dab it in the Early Espresso ink. Swirl this onto the cardstock just above the Cherry Cobbler ink that you’ve already applied. You can over-lap the colours to blend them.
When you start swirling the ink onto the cardstock, it can look a bit patchy – don’t worry… keep blending it in! I find the best action is a circular motion.
Take your Bird Punch and slide the cardstock into the punch. Check how you’re going for ink coverage and you can always add more ink if you need to. Line up the bird so that the Cherry Cobbler ink shows as his breast, and punch out the bird.
I like to sponge the edges of the bird shape to give it more definition once it’s punched out. This also ensures you get good ink coverage on the sides of the cardstock and hides those white areas you might have missed with your original sponging.
Adhere this to your Holly image and then adhere the wing with a Stampin’ Dimensional.
I wrapped some Special Christmas ribbon around the Fancy Favour box and then adhered my piece of Whisper White (the join of the ribbon is hidden underneath the white cardstock!) I added a mini library clip with a small knot of ribbon to finish it off. Too easy!
Give the Robins a go – they look really pretty, and the great thing is that each one will be individual due to how you swirl on the ink for the red-breast.
Oooh – it’s beginning to look a lot like Christmas! Thankyou for visiting!!


Leave a comment